Holy Bolt Paladin Build Guide for PD2
The best starting Setup for the Paladin that uses Holy Bolts to deal tremendous damage to all enemies and heal allies.Holy Bolt Paladin Build
Last Update: May 5, 2026
Introduction
After many rounds of various changes, the Holy Bolt continues to be one of the strongest Skills you can use while starting a new Season. It combines many important features into one: you will have very good Damage even without good Items, and the Holy Bolt heals your Mercenary, which makes them much more reliable during difficult fights. The Magic Damage type is very rarely resisted by Enemies, although breaking this Immunity type is much harder to achieve.
The Paladin class offers a variety of tools to deal with every situation, which is very important while you operate on a limited budget. You will have two very good movement Skills at your disposal, and Capping Block with the Holy Shield is trivially easy. The Defensive Auras should be picked according to the situation. For the most part, the Redemption Aura offers excellent sustain for your Life and Mana. If your gear lacks Resistances, or you plan to fight Uber Bosses, a specialised Resist Aura greatly helps with reducing certain Damage types. If you just need more Damage, the Sanctuary Aura is the only source of lowering Magic Resistance on your Enemies. If you plan to play with groups, the Conviction Aura will be greatly appreciated by your party members.
The Holy Bolt fires 3 projectiles, and all of them can hit the same target, which is why proper positioning is very important. You will also want to have your mercenary in line, so you can heal them up along the way. You can also supplement your Clear Speed with Fist of the Heaven, which fires slightly weaker Holy Bolts in nova. You can start using the Holy Bolt right from the start, although completing the Normal difficulty is usually done more easily with any Melee Attack relying on bonus Damage from Elemental Aura, and respecing once you can ensure level 25 on the Holy Bolt to unlock all additional projectiles.
Recommended Breakpoints
The Holy Bolt is quite a fast Spell, but getting a better Cast Rate is always important. It not only improves your DPS, but might also save your Mercenary from trouble.
- Faster Cast Rate (FCR): 75% (low budget) → 125% (high investments)
- Faster Hit Recovery (FHR): 48% (good enough for most content)
Keep in mind that using Spear or Staff significantly slows down your Hit Recovery, which requires more FHR to countermeasure.
Stat Allocation
- Strength: Enough to meet gear attribute requirements
- Dexterity: Enough to meet gear attribute requirements
- Vitality: Invest all
- Energy: Nothing
You may need some extra Dexterity to get your Block Chance maxed out. Everything else should contribute towards raising your maximum Life.
Pros
- Magic Damage type, which is rarely resisted
- Very efficient at low gear levels
- Can do all content in the game
- Great sustain for you and your party members
Cons
- Limited AoE in open areas
- Immune Enemies are hard to overcome
You can also visit this page to check our other Project Diablo 2 Builds
Skill Trees
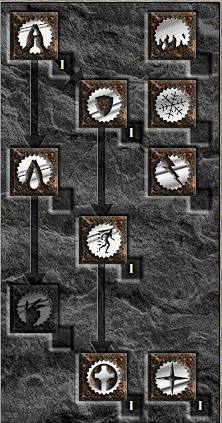
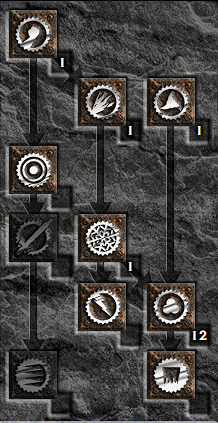
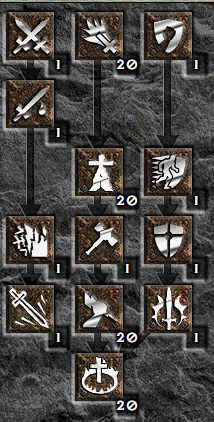
The Holy Bolt and its synergies are your main priority. You will also want to pick up the Joust and Charge for excellent mobility, and the Holy Shield for the extra Block. The Fist of the Heavens shares the same singeries as the Holy Bolt, so it can be quite a successful supplement for your AoE Clear.
The rest of the points are very flexible. We recommend getting the Redemption Aura for comfortable sustain during Clear, but if you don't mind drinking Potions, you can invest more into Damage through Sanctuary Aura instead. The Vigor is also not a bad choice, as it greatly improves your mobility even more. The Resist Auras are very useful to have in early progression, but the maximum Resistance bonus can be very valuable against Uber Bosses.
If you have more points to spare, you can also invest a bit more into Joust to reduce the Cooldown or Holy Shield if you still lack Block Chance.
Gear
Your first target to acquire should be the complete Griswold's Set, ideally with beneficial Corruptions on top of it. It grants a large bonus to your Skill levels, FCR, and all Resistances, while also allowing you to amass a large quantity of Magic Find. Later on, you will want to replace it with Runewords and Uniques. For your Shield, the Spirit is the most popular choice to use while pursuing Herald of Zakarum or Ephemeral. Hand of the Blessed Light offers up to 6 levels for your Holy Bolt, but you can also use Neophyte or Heart of the Oak Runewords, which grant fewer levels but offer a bit of FCR instead. You can acquire the FCR from Magefist or Trang-Oul's Claw Gloves, too. For the Helmet, a Harlequin Crest is a good option, but ideally, you should use a Rare or Magic Diadem with extra levels and FCR. You can continue to use the Griswold's Armour, or pick the Skin of the Vipermagi for bonus FCR too. For maximum efficiency, use Enigma to mix in the Blink into your movement rotation. There are no exceptional Boots for this Build; you can use this slot to deal with being Frozen, improve your sustain on kill, or get some extra Magic Find.
The Jewellery is similar to any other Spell Caster Setup. You will need additional Skill levels, FCR, or fill the defensive gaps. The best choice lies among the popular uniques such as Arachnid Mesh, Mara’s Kaleidoscope, and any Rings with +1 Skills such as Wisp Projector, Kadala's Heirloom, Bul-Kathos Wedding Ring, or the Stone of Jordan. The best Amulet to use is a Rare or Magic option with additional Combat Skills paired with FCR, Life, or Magic Find.
Charms
At first, Grand Skiller Charms are the best option, although after reaching ~40 level on your Holy Bolt, it is better to use Large Charms with 3% increased Magic Damage, ideally paired with maximum Life. On Small Charms, look for Life, FHR, and Magic Find.
You will obviously want all 3 Unique Charms: Gheed's Fortune, Hellfire Torch, and Annihilus. They are useful for every Build in the game, so you will want this combo sooner or later anyway.
Minimum Item Level: 80
Occurrence Rate: 5/75
Mercenary
There are a few viable options here. You can simply delegate your Act 2 Mercenary to use the Sanctuary Aura obtained through Asylum. Alternatively, they can use Stormlash to trigger Static Field repeatedly, which massively lowers the maximum Life of your Enemies.
- Flickering Flame or Ferocity (Helmet)
- String of Ears or Nosferatu’s Coil (belt)
- Shaftstop or Innocence (Armour)
- Lava Gout's or Dracul Grasp (gloves)
- Rare Boots with Life, Movement Speed, and Resistance
Final Thoughts
The Holy Bolt Paladin is one of the best choices you can make to comfortably start your journey through Project Diablo 2, which will carry you through all content in the game. It offers a healthy mix of offense, defense, and clear speed, which is ideal for both new players and veterans.
We will continue updating this guide with future Project Diablo 2 changes and expand our PD2 content with more builds and strategies.
If you have suggestions or would like to see other builds covered, feel free to share your feedback—it helps us improve and deliver better guides.
Images used in this article are the intellectual property of Blizzard Entertainment or its corresponding owners.