Dual Universe Beginner's Guide - How to Start?
A comprehensive Beginner's Guide on how to start your adventure in Dual UniverseDual Universe
Beginner's Guide
Introduction
Dual Universe is a great Space Sandbox Game, but it does not hold your hand - after the tutorial, you're on your own. Because of this, the early game is quite brutal and often confusing. This guide should help you clear things out a bit and make the start considerably easier.
Note: This is meant to be more of a reference guide than an all-in-one mega manual that would take ages to read and bore everybody to death. If you feel that some in-depth information is missing, you will likely find it in specialty guides that are fully-dedicated to one aspect of the game. This one will give you a more wholesome perspective and provide you with general guidelines that will help you get started in this great game.
Getting Started
New players often get overwhelmed by the number of mechanics Dual Universe introduces. The massive size of the game doesn't help with the initial experience either. Luckily, there are some things you can do to make your first few in-game hours much more pleasant and productive; here are some tips and tricks, dos and don'ts, that will help you to get started in Dual Universe.
|
Fiddle with the Field of View slider in the graphics options menu - The default setting is quite low which restricts your vision quite considerably and puts you at a disadvantage. The less you see, the more likely you are to miss something important, not to mention that low FoV can make you motion sick. Increasing the FoV will effectively zoom out your camera and give you a more panoramic view. |
|
Trust us, the In-Game Tutorial is there for a reason - We urge you to complete each and every one of the available tutorial missions - they will help you learn and understand the game's mechanics. Moreover, after completing tutorial missions will receive some money and skill points; two things that are rather scarce and extremely useful at the start. Note: If you've already skipped the tutorial missions, don't worry, they can also be started on the Sanctuary (to access them, go to any Dual Universe Market /Hub located on the Sanctuary). |
|
The closer to a Market, the better - When the game prompts you to Claim your first area on the Sanctuary, pick a piece of land as close to the Hub as possible. Distances in the Dual Universe game are massive and traveling 70 kilometers on foot will take you A LOT of time... Not to mention that every minute you spend on traveling is a minute less you spend on making actual in-game progress. Of course, the later you start the less choice you will have but there are still plots of land, located in decent areas, up for grabs. Here is a visualization of what we have in mind:
|
|
Set up the Marker System - Pressing the alt+v combination on your keyboard will bring up the Mark Management menu. You can use it to determine which additional information is displayed on your screen when you press the "v" key on your keyboard. This information takes the shape of Markers that appear over various things (Players, all types of Constructs, and so on) and a hex grid that shows territory borders. If you enable all of it, your screen will get flooded with a lot of unnecessary info. Our recommendation is to enable Markers for Players, Static Constructs, and Markets. Other markers are not really necessary, at least early in the game. Once you progress further, you will want to enable/disable the Markers as needed. |
|
Talents are the single most important thing in the game - They make almost every in-game activity you perform more efficient or quicker. If you want your character to become better at something, investing in the appropriate Skills is the way to go. You can bring up your character's Talent Window by pressing F2 on your keyboard. Via this window, you can unlock Talents; immediately with the use of Talent Points or slowly via the Learning Queue. Mining and Inventory Talents are generally a good place to start. Developing them early will ensure quick progression - you will mine resources quicker and have more space for storing them for future use. Important 1: Your character learns Talents you have queued even when you are offline! This means that you should always have new talents queued for learning. Important 2: Your Talent Accumulation Rate depends on the status of your Learning Queue. The maximum talent accumulation rate is 90 per minute, to achieve it, you have to have talents queued for learning. If your queue runs out of things to unlock, your Talent Accumulation Rate will drop to a mere 6 per minute. This dependence ensures that players who play regularly develop their characters much faster than the ones who log in only on occasion. |
|
Find an Organization - The strength of a group is always higher than the strength of all its individual members - power lays in numbers, especially when there's a whole universe to explore and conquer. Finding some like-minded players you can play with will affect your reception of the game in a very positive way. While in a good Organization, you are a part of a well-oiled machine; you don't have to be a jack-of-all-trades anymore - you can heavily specialize in one field (mining, refining, etc.) and your mates will take care of things your character is not too strong with. This way, you can achieve efficiency a solo player could only dream of. Moreover, a group offers protection - you are never safe when you're on your own, remember that. Note: You can bring up the Organization menu by pressing the F3 button on your keyboard. Just remember that some Organizations have strict rules and requirements that you will have to meet before your application is accepted. |
|
Learn the game's economy - Dual Universe features a fully player-driven and decentralized* economic system, and when we say "fully player-driven", we mean that. Every resource you find on the market comes from players, every bit of Quanta you will earn from selling stuff will come from players**; The main and only propellant that drives Dual Universe's economy forward are its players. Every single in-game asset has to be built by players from scratch; there are no pre-built vehicles, ships, or structures in Dual Universe. Almost everything you see, except terrain features, is fully player-built. This forces players to create supply chains - if you'd want to mine, refine, and craft everything by yourself, you would lose a lot of money in the process - it is often better to sell raw resources and buy already refined ones. Keep this in mind before you start engaging with the economy. *In-game Trade Hubs are local, which means that prices of goods will vary greatly depending on multiple factors, like the resource's availability in the area (prices may differ from planet to planet and even from region to region), local player population, the intensity of PvP, and so on. You can take advantage of this and make some Quanta by transporting goods from one Hub to another, just keep in mind that it might be quite risky sometimes. **With two minor exceptions - Tutorial rewards and special Developer-made traders that can buy a portion of goods from the Market to inject some more Quanta into the game's otherwise hermetically sealed economy. This way, developers can directly control inflation and respond to changing player population to ensure that Dual Universe's economy stays healthy. |
| Take advantage of how the character's inventory works - The first 20 tons of materials you carry on your character does not count to the overall weight of a construct you're in. This means that you can have up to 20 tons of ore in your pockets and still take off in a small ship without a problem. However, if you were to do that after storing that 20 tons of ore inside the ship, it would not be possible because of the ship's limited maximum load. |
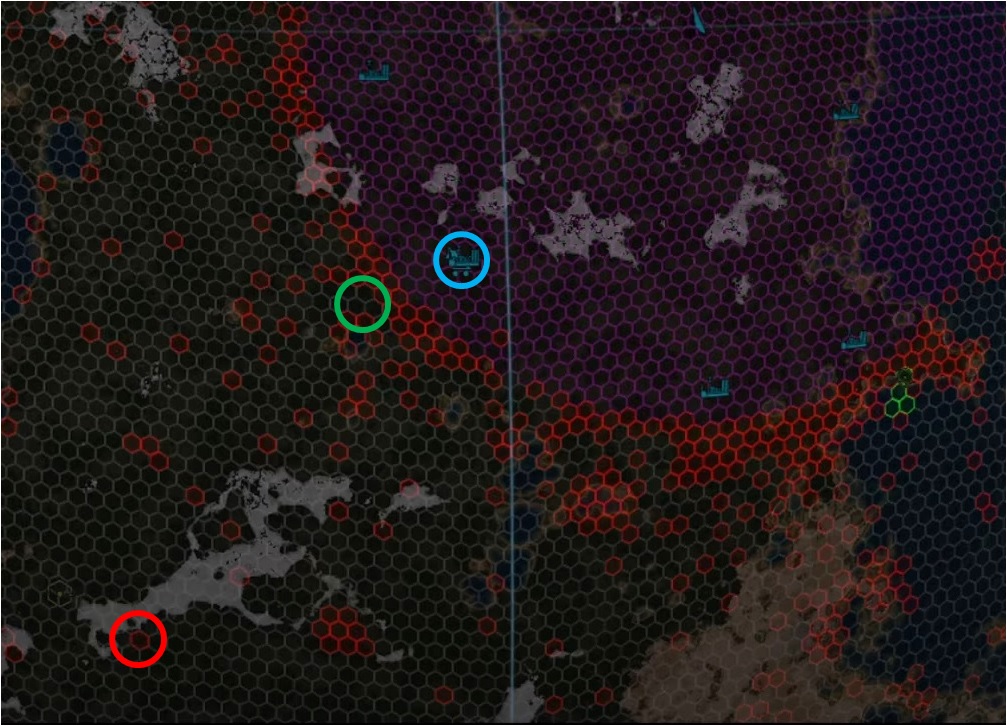 Trade Hub/Market is marked with the Blue Circle. The closest, not-yet-claimed, areas are marked with the Green Circle (you should try to claim an area such as one of these - it might be difficult as most of the areas around Markets were Claimed already). One of the biggest mistakes you can make early is marked with the Red Circle (claiming an area located hundreds of kilometers away from a Trade Hub).
Basics of Mining
Mining is where everything starts. Without it, there would be no resources, materials, alloys, elements, units, or constructs, there would be no economy. It is also one of the most profitable in-game activities players can perform without a large industrial supply base. Because of this, learning how to mine efficiently is paramount. Below, we summarise the most important aspects of mining that will help you kickstart your own digging operations.
|
Get to know your Mine Tool - While having your Mine Tool selected, you can hold your control key and use your mouse wheel to increase or decrease the diameter in which your Mining Tool will extract materials. Increasing the diameter will enable you to dig wider holes and extract materials from a larger area. Clicking and holding the middle mouse button (mouse wheel if you will) will make your Mining Tool auto-mine which is a bit quicker than clicking each time. Note: You have to unlock the appropriate mining talents before this feature becomes available to you. |
|
Scanner Tool and Directional Detector are your best friends - With them, you will be able to locate ore veins. At first, you will use the Scanner Tool; It is very simple to use - the line that appears on the heads-up display indicates how close you are to the ore; it is drawn from right to left, which means that the more recent readings always appear on the right-side. You want the line to go down, as this indicates that you are getting closer. Once the reading hits very low numbers, you should start digging down - if the scanner indicates "0", it means that you are on top of the vein. At this point, it is a good idea to take out the Directional Detector which will help you pinpoint the vein's location. The detector will indicate the location in which you have to dig, to get to the ore vein, by playing a distinct sound and displaying a "wave" at the bottom of its HUD (it kind of works like a sonar). Note: Upgrading your Scanner Tool early is a good idea as doing it will effectively double its range. |
| Eliminate downtimes with Linked Containers - Once you declare one of your containers as "linked" you can view its contents and place ore in it from afar. The actual range at which you can do it can be increased with appropriate skills. Thanks to this, you will not have to go back to base once you fill up your inventory, provided you don't venture too far. |
| Skills are extremely important - Specializing your character in Mining will allow you to extract resources in a much more efficient way. You might even want to consider creating an alt whose whole purpose will be mining for resources. |
|
Territory Scanners come in handy - At some point, you will want to industrialize your mining operations. Territory Scanners should be some of the first things you invest in - these Units allow you to scan whole areas of land for natural resource deposits. Note: To use Territory Scanners in the most efficient way possible, you will have to invest in a ship and mount three of them on it so that you can scan up to three tiles at once. Tiles are hexagonal in shape, so to scan three at a time, your ship has to be "Y"-shaped so that you can place every end of it, with a Territory Scanner mounted, on a different tile. To do this, park in a place where 3 tiles are in contact with each other - as shown on the following screenshot:
|

Basics of Industry
After learning how to Mine, it is time to set up your own industry that will fuel your further developments.
Here's how to do it:
| The first and the most important thing you have to know before you start your own Dual Universe industry is this: Selling raw ore and investing the money you got from it into developing your industry, by buying ready Industrial Units, is much more efficient than trying to be self-sufficient and crafting everything yourself. This happens for a simple reason, mainly, experienced and well-developed players can mine, refine, and craft much more efficiently than a new player can, and thus they require much fewer resources than you to make the same amount of things. Keep this in mind. Moreover, crafting takes a lot of time, especially early in the game, so you will make much faster progress if you just buy ready Units. |
| Link a Container to yourself - doing this will save you the hassle of running back and forth to fetch the needed materials. |
|
It all starts with the Core - After you decide where you want to start building your Industry, you should place a Static Core there. The area you will see around the Core (indicated by the blue square grid) shows you how far from the Core you can build. Note: Keep in mind that the Core is always in the center of its build area. This means that you should place it quite high above the ground; otherwise, you will lose a large portion of the build area. Use PgUp and PgDown keys to move the core up and down before placing it. |
|
Building the outlines - All Voxels have to be attached to something (you can't just build things in the air or directly on the ground), so you have to start building at your Core and move out. Once you build the backbone of your base, you will be able to attach new Voxels to it. Voxel system is quite intuitive, luckily and you should have no problems with building multiple floor levels of your "factory". Note: Remember that your resources are limited; creating a small platform, on which you will place your first Industrial Units, should be enough at the beginning. Building walls is a waste of material in general - at least early in the game when you're safe from PvP. |
|
Place your first Industrial Units - There are quite many of these, but you will want to start with:
Important: Don't forget to link two boxes to your Industrial Units - every Industrial Unit needs input and output to work (storage from which it can take raw resources and storage in which it can put its produce). To do it, you will have to place two boxes near the Unit and use the Link Elements Tool to connect them. Note: You can (and should) interact with Industrial Units to program them. All errors will also be shown in the panel, so you will be able to correct any mistakes (like not providing the appropriate ingredients or not linking storage).
|
|
Producing Fuel - Fuel is produced via a separate chain. To make it, you will need:
|
| Use Transfer Units - These Units can be used to automatically move materials around your factory. With them, you won't have to oversee everything and be free to do other stuff, like Mining. Moreover, Transfer Units are perfect for "fixing" less than optimal factory designs. |
| Expand from there - Once you build your first industrial chain, you can expand by building further ones and upgrading into the larger versions of Units. |
Constructing Your First Spacecraft
The first thing you have to keep in mind while constructing a ship is a simple fact that the bigger it's going to be, the more resources it is going to cost. Costs associated with the ship construction tend to rise exponentially with its size*. This happens because of a few reasons, mainly: bigger ships need bigger and more powerful components which are much more costly to produce, manpower needed to craft all the components from scratch and to assemble them rises with the project's complexity - bigger ships have much more modules and require much more work in general. Because of this, your first ship should be small and as ergonomic as possible.
*Also, bigger ships are much easier to hit which makes them easy prey in PvP, especially if they are inadequately armed and protected - which is a common thing among ships made by new and inexperienced players.
Here are some tips that should help you construct a perfect beginner's vessel, ideal for flights between your base and a Trade Hub:
|
Make sure your ship is aerodynamic - The less streamlined the ship, the more drag it will experience while flying in a planet's atmosphere*. As a rule of thumb, you should avoid "boxy" shapes and making your ship wider than necessary (imagine that you try to push a model of your ship through the water - you will have a much easier time doing that with a sleek design). Aerodynamic ships will accelerate quicker and reach higher top speeds inside the atmosphere. Important: In extreme cases, drag can create enough friction to destroy your ship - this happens mainly when you try to leave or enter a planet's atmosphere, but it might happen everywhere within the atmosphere if you accelerate a badly-designed ship to a dangerous level. If you notice that your ship starts to heat up and take damage, better slow down... *The atmosphere's density varies from planet to planet and some moons don't have an atmosphere at all. The denser the atmosphere, the more important the ship's aerodynamics. |
|
Symmetry is quite important - Good news for people who suffer from OCD here, symmetrical ships are easier to control as they don't have balance and uneven drag issues which plague some not-well-designed unsymmetric designs. You should also try to distribute the weight evenly, but this is less of a problem as it can be minimized with the proper placement of Adjusters. |
|
What you will need, at the very least - Small ships are relatively cheap to construct, especially if you are going for a bare-bones design. Components that are necessary include:
Note: You don't actually need a cockpit to fly, all you need is a controller. If you want to make your ship void-worthy, you will have to add:
|
| Laser Emitters will show you where you're going - Small and fast vessels can be quite difficult to control with precision. Installing Laser Emitters in the front of your ship will help you by precisely indicating where your ship is heading. |
| It's all trial and error - If you feel that something's wrong with your design, it most likely is. Don't be afraid to re-adjust it and add more Elements to make it work better. |
| Don't forget to create a Blueprint - A blueprint contains all details of a construct and will allow you to re-construct your ship in an instant, should something bad happen to it. If you are happy with your design, you should definitely make a blueprint of it as it will save you a lot of work and even enable you to share your design with friends. |
|
END NOTE Fun should always be the most important - trying to play "perfectly" and always seeking to optimize everything will quickly kill your interest in the game. Don't let that happen, play for fun! We hope that you have found this guide useful and informative. If you liked it and want us to add more guides such as this one, please let us know! Also, we will be happy to receive constructive criticism that will help us improve our future work so leave your suggestions in the comments section below. |
Pictures used in this article are the intellectual property of Novaquark.