Blood Surge Demon Spawn Build for Hero Siege
A top-tier caster setup with insane AoE and single-target damage, which makes it one of the smoothest builds in the gameBlood Surge Demon Spawn Build
Last Update: April 14, 2026
Introduction
Blood Surge Demon Spawn is one of the strongest caster builds currently available in Hero Siege. It offers exceptional clear speed, extremely high Area of Effect damage, massive single-target potential, and very smooth progression from the early stages of the game all the way into advanced content. If you are looking for a powerful spellcaster that feels strong almost immediately and scales naturally as you improve your gear, this is one of the safest and most rewarding choices you can make.
Season 9 nerfs did tone the build down slightly, but that only says a lot about how absurdly powerful it used to be. Without those changes, and especially with the introduction of the Incarnation Tree, Blood Surge would feel like a build imported from a completely different game in terms of raw power. Even after the adjustments, it remains a top-tier setup that performs extremely well in nearly every important category.
Pros
- Insane clear speed
- Tons of AoE damage
- Massive boss damage
- Smooth leveling
- Easy progression
Cons
- Mediocre mobility
- Little to no team utility
Skill Trees
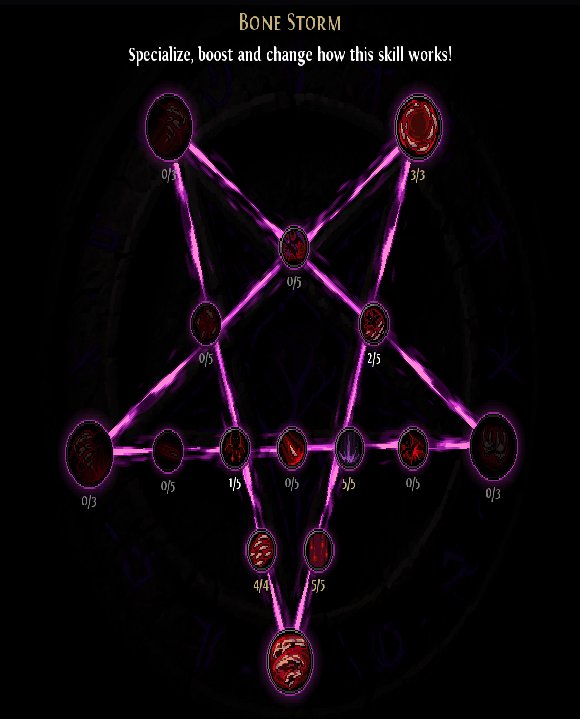
Leveling Tree 1-40 (Bone Storm)

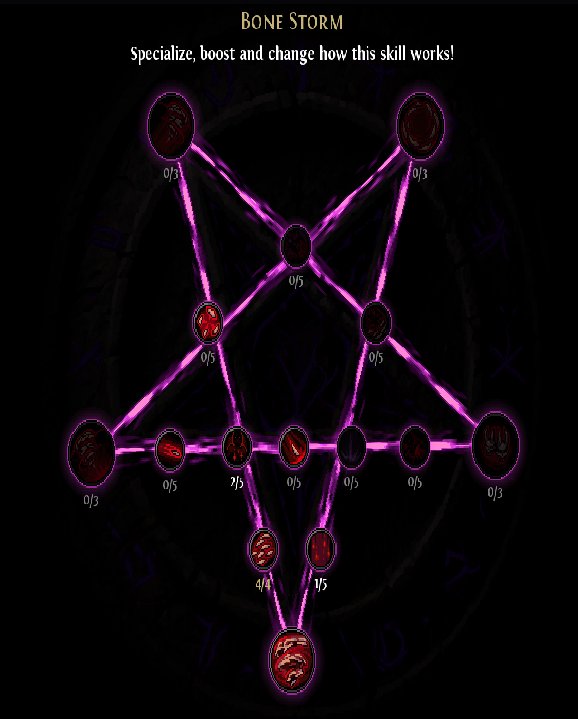
You can start leveling with almost any early skill, but Impale or Blood Bolts are the most convenient options before your core setup becomes available. As soon as you unlock Bone Storm, you should switch to it immediately and refund the points invested into your previous leveling skill. Bone Storm offers much better coverage, smoother clear, and greatly improved overall tempo during the early game, which makes it the natural choice until around Level 40.
At that point, you transition into Blood Surge and begin following the more advanced Level 100 trees shown below. For your attributes, it is recommended to split points between Vitality and Intelligence fairly evenly early on, as this gives you a much more comfortable balance between damage and survivability. Later, once you enter end-game and acquire stronger equipment, you should move fully into Intelligence, as high-tier gear will provide enough Life and defense on its own.
Level 100 Blood Surge (AoE) Tree
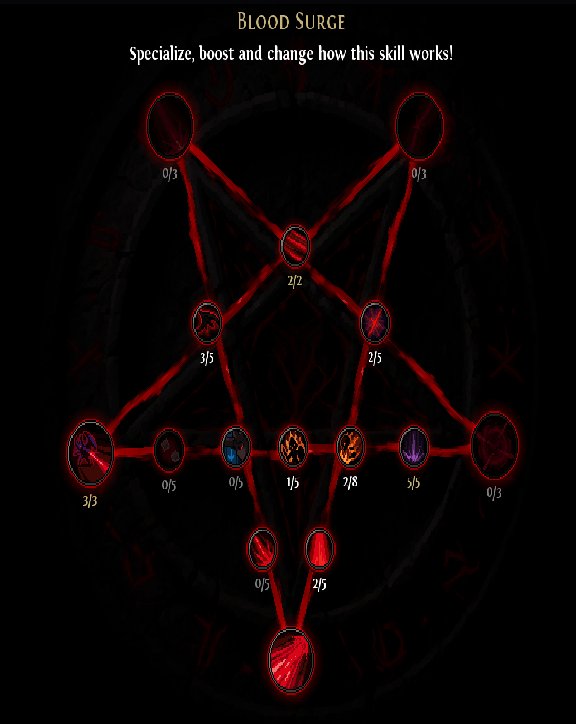
This is your main Area of Effect setup, built around Blood Surge and its naturally absurd screen coverage. Its clear is pushed even further by the Blood Tendrils and Rays of Blood nodes, allowing the skill to wipe large packs effortlessly and chain damage across wide portions of the screen.
Our recommended specialization here is Hematopoiesis, which increases the tick frequency of Blood Surge. In practice, this means the skill creates even more follow-up surges and tendrils, resulting in noticeably better coverage, smoother mapping, and much stronger general clear speed. Arcane Break is also a mandatory part of this setup, as it substantially boosts your damage and helps the build deal with tougher enemies without forcing you to swap to your dedicated single-target setup too often.
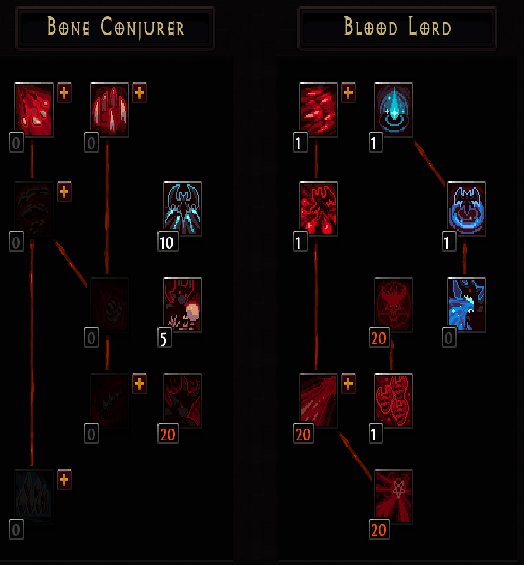
Level 100 Bone Fragments (Bossing) Tree

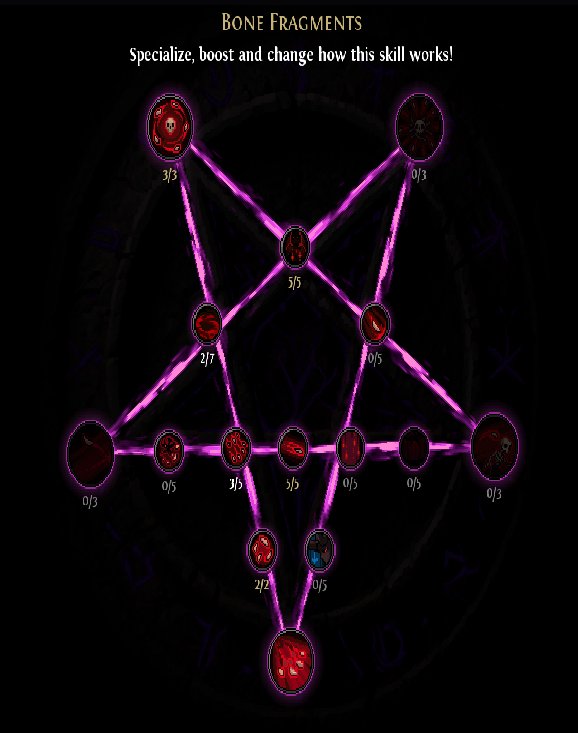
This is your dedicated single-target and bossing setup. We are taking the Demon's Grip node on the specialization tree, as it offers the highest raw damage out of the available options and gives the build its strongest boss-killing potential.
Outside of that, you will also be using Bone Storm with Everlasting Storm, turning it into a permanent effect around your character. This serves several very important purposes at once: it helps trigger Arcane Break, applies Bleeding for extra damage through your passive interactions, and activates Cartilage for additional offensive value. Altogether, this creates a highly efficient single-target package that lets Blood Surge Demon Spawn melt bosses far more quickly than most caster builds in the game.
Other Relevant Information
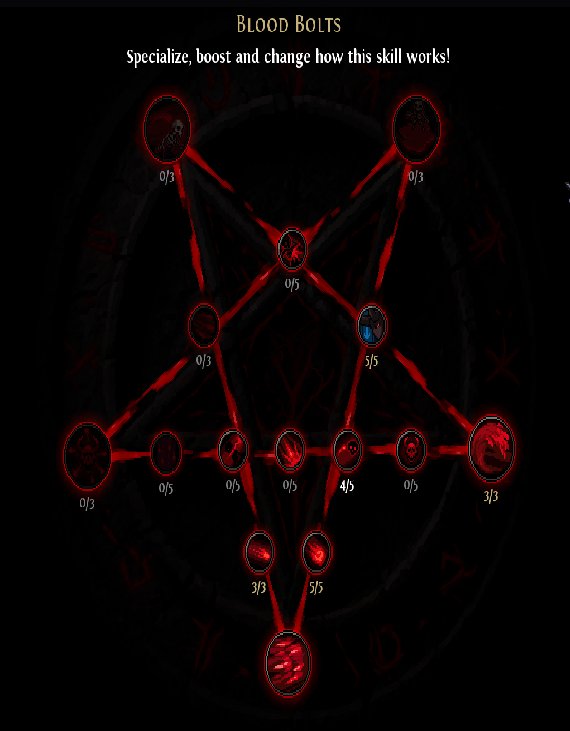
This Blood Bolts combination should be used across all of your passive tree variants. The key node here is Wave of Blood, which should be maxed out for the extra Movement Speed, FCR, and Arcane Damage. These bonuses are simply too efficient to ignore and add a lot of quality of life to the build, while also contributing meaningful damage.
In most situations, you should be using Ominous Aura for the additional damage it provides. Depending on the specific tree you are running, your extra points should then go either into Ossification for more mobility and smoother general gameplay, or into Single Out if you want to push your boss damage even further.
Mana Shield is also a very important supporting node for the build. During progression, investing more points into it can feel very valuable, but once you obtain strong end-game gear, a single point is usually enough to get the effect you need while freeing up the rest of your points for more impactful damage or utility options.
Gear
Leveling/Early Gear
End-Game Gear
Relics
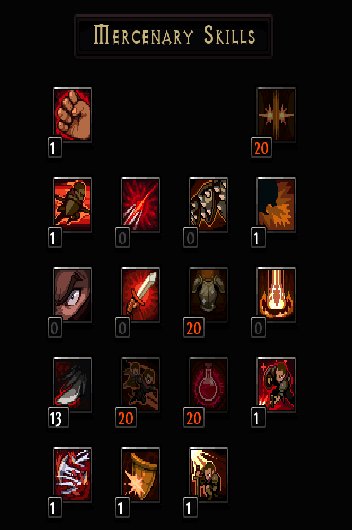
Mercenary
For this build, we recommend using the Knight Mercenary, focusing on survivability and additional Magic Find bonuses. This setup is especially strong early in the season, where extra income and consistency are more valuable than advanced optimizations like aura stacking, which we are not covering in this guide.
The main goal is to make your mercenary as tanky and reliable as possible. You should prioritize and max out all defensive passive skills that reduce damage taken, increase armor, and improve overall durability. A properly built Knight will rarely die, allowing him to consistently provide value without needing constant resummoning or micromanagement.
For active abilities, invest only single points into utility skills that offer stuns, taunts, or other forms of crowd control. These abilities are useful for keeping enemies off you and improving overall safety, but they are secondary to the mercenary’s primary role as a durable frontline and passive bonus provider.
Recommended Merc Gear
Final Thoughts
Blood Surge Demon Spawn is already one of the best caster builds in the game, but there is still plenty of room for experimentation and refinement. As Season 9 continues, we will do our best to keep this guide updated with the latest findings, optimizations, and alternative options that may prove even more effective in specific situations.
We also encourage players to test different setups on their own, as there are still many aspects of the presented character that can be explored further. Small changes in gear, relics, mercenary choices, or pathing can often lead to meaningful differences in performance and playstyle.
Be sure to visit the site regularly for more up-to-date Hero Siege builds, guides, and other useful content.
Images are the intellectual property of Panic Art Studios.